Saturday 20 September 2014

Nakhoe's Double Cabinet-In Final Stage

Hi guys,

It been a new adventure doing this new project, since it was the most challenge so far especially in creating this very big size of cabinet. In addition, it also push my level of detail(for door panel) in new a perspective of design. Thanks & a honor credit to Legend Woodworker-Helmi(Melaka) who had gave me an rough ideal on how the panel should or gonna look alike.
From the original design of Helmi that mainly via the pallet wood, I did modify it to be more elegant & a bit style, especially for my client. I did came out with this 4 design & eventually I did on design no.1 & no.3. The process to make it(in the first time) of course had suffer several hour gained several method, most of it ends up with some failure(which I did learned something).

Tarraaaaaa...here is the finishing,not yet in the right paint...huhu another 5 panel to go(suddenly I decided to simplify the upper door on above within 2 instead of 4. because it used 100% solid-wood, the weight sure a bit heavy then the market panel door, I plan to install 3 hinge instead of regular installation of double hinge(in the ways to absorb the weight.
The because the client a the fan of the light green(since I did when to his house,seeing a lot of this colour play around of his house, event the mug for drink he pass up to also in this kind of colour.
 Did finishes in 1st layer of the gloss paint, look so sting,mix up with cool blue for the rack-sure it gonna give a new look of the cabinet. Normally for the color mix, I rather NOT to play safe, meant that I love to play & combine some contra color to be match in same portion of cabinet. For the door I plan to paint in Mint syellek so that it can show up the detail of the door panel.
Suddenly I decide NOT to be stoneMan anymore, I gave a close wind of whisper...call up for all & any available clamp to support me, there you go, all clamp in very teamwork.

For those who believe in me, My heart shall always be with you.

Sunday 14 September 2014

A Pay visit on Previous Project(Outdoor cage & part)

Last week, I when back to my parents in law house, thus I did have a chance to check what had happen to my project. It update, it have a new arrangement with some stuff goin on, overall it got A+ on all of it. 
 For the double laundry rack, it seen to be the exact stuff been put, easy to be reach & directly pour into the hungry washing machine. The lower rack also used to put some clothes for the purpose. I did found some mistake on my design, vs with the hanging unit, it did cross each others that cause it can't be fully used for towel hanging. The space was quite limited, I can't be easily shift to the left since the multi-broom hanger located. Thus, I got stuck in some how, were should I remove this unit.
 Hanging towel that give me some minor problem, to be mention it flip hanging unit, can be easily flip to the up level for maximize storage.
I proud multi-broom hanger, can install as all kind of broom, normally we kept on the floor, then in long time it shall cause the broom bend. It easy to be install & grap.
 At lastly, the hanging kitchen cabinet, as it the only design in the world, until somebody copy it. As additional project shall be the extension of this, for the rice cooker & water heater unit.I try to make a new technic(wood frame-box), maybe install some electrical unit inside it....stay tune!

For those who believe in me, My heart shall always be you!

Mega Shoes Rack-Nakhoe

Hi guys,

Since from last week has been such a busy day for me, there's so many thing need to be catch up & done. Of course I need to settle all my daily & routine jobs-properly. On last week, I did try to finish the main structure of this 2 outdoor cabinet from 1 of my client, require a specific size of cabinet that can keep all their family's shoes. The design shall be in 3 major compartment which is LOWER CABINET(mainly for shoes rack), MIDDLE RACK(for decoration purpose) & lastly UPPER CABINET(for some storage).

As update, the project still in progress since I still figure out the best profile for the door panel, as it should be special for each people that believe on me. The shoes rack for example, I did some special arrangement were the last 2 rack I made it a little small, specially for their kids-since the lower level not to be suitable for adult daily bend(back-pain etc) Each rack also I create with some extra gap at the back so that it can  be helpful during dust cleaning, not such trap area.
 Upper main frame cabinet, due to not enough space for fabrication, I did temporary parked it in front of my house. So far,nothing special able to be think of me on this frame-perhaps i need to wait until the finishing jobs.
 Some of the rack cut via my circular saw, at the ends i'm still need to remove some burr. Later on for the shoes rack, it shall be attach in slice ways together with the middle frame. Small rack as mention for kids shoes.
 I did a double based(upper & lower) to make a strong frame for the lower side since it shall become the main support of others 2 compartment. During this time keeps thinking of those Kreg Jig...it might be helpful.
 All joint with some nail & white glue & holes with my "G" buddy. I try to put some trust this time within nail & glue since for some special joint(main frame) I'll use the Bostik white glue, hold quite strong.
 The angle & gap for each shoe been decide for several time for maximum space & reasonable for all kinds of shoes storage(accept boot) , very simple method to mark the angle by put some on my L jig, then it easily generate a angle for me.
 Then the space to hold for rack been installed for both side & attach with some glue & nail.
 Because I don't have such a fancy wood clamps, thus I combine the G with my regular clamp(limited just for 3 points only), thanks it hold properly.
Taraaaaaa.... in been test by my shoes, it really nice even it the first time making some MEGA rack, hopefully I shall able to turn with some magic on this rack.

For those who believe in me, my heart shall always be with you-Stay in touch!

Thursday 4 September 2014

KJ-You Hot Counter Bar!

Hi KJ,
You counter bar ready for fabrication, overall shall be discuss later, take a look on it, just let me know for any modification update. Looking forward to serve you new customer's table!
version1


version2
Colour as what you need, black & light yellow, I don't suggest to be a such strike yellow, it shall look low profile by this combination,believe me!
Equip with double drawers with each side serve of 4 compartment each, don't forget the middle drawer for fast grap.
In addition, some pigeon racks for any specific form. The size shall be as per discuss(4' X 2'  X 2 1/2')
It would be great if it come with this modern office chair, it suit so well, indeed!


For those who believe in me, My heart shall always be on you, stay in touch!

Wednesday 3 September 2014

Zulhaniff_Design for BackSit Ads

 Hi Haniff,
Take a look on my draft, hopefully you like it, let me know if got any update,OK.
Overall design size(could fit bigger size of A4 Ads even in portrait OR landscape)


Position for the Ads bar-as suggest-same level of shoulder-better view of passenger
Picture shown the main Ads can be install in both left-right


As suggest-puppet with spring attach on the board-may attract the passenger during car in travel-notice them on extra copy at the back. The puppet hand point to the copy.


Multilevel of copy level adjustment-for multiple sizes of copy(with lock)
Don't forget: Company brand who brought this board advertisement program.

Some dimension to be consider.

For those who believe in me, My heart will always be with you.Stay in touch!

Monday 1 September 2014

PAYBACK Weekend : Outdoor Cage Upgrade: Part2

At the end, all those debts payed within this week, with some extra effort & strength I pull it out all together andI was able to finish some minor projects. For this week, I did re-create some of "upper sink tray" for my mum in-law, which had become the biggest debt of all time-each time I when home(Alor Star) I shall see this mess. In record(history), I did bought those 3 steel tray as a gift for entering new house-but is just a beginning of my nightmare-since the temporary attachment-which I used such a cheap & non-engineering part... since not to be helpful once come to the heavy load-it dropped & did crashed some of the golden priceless plate of my "Ummi"...sorry for those lost! I'm really sorry. 
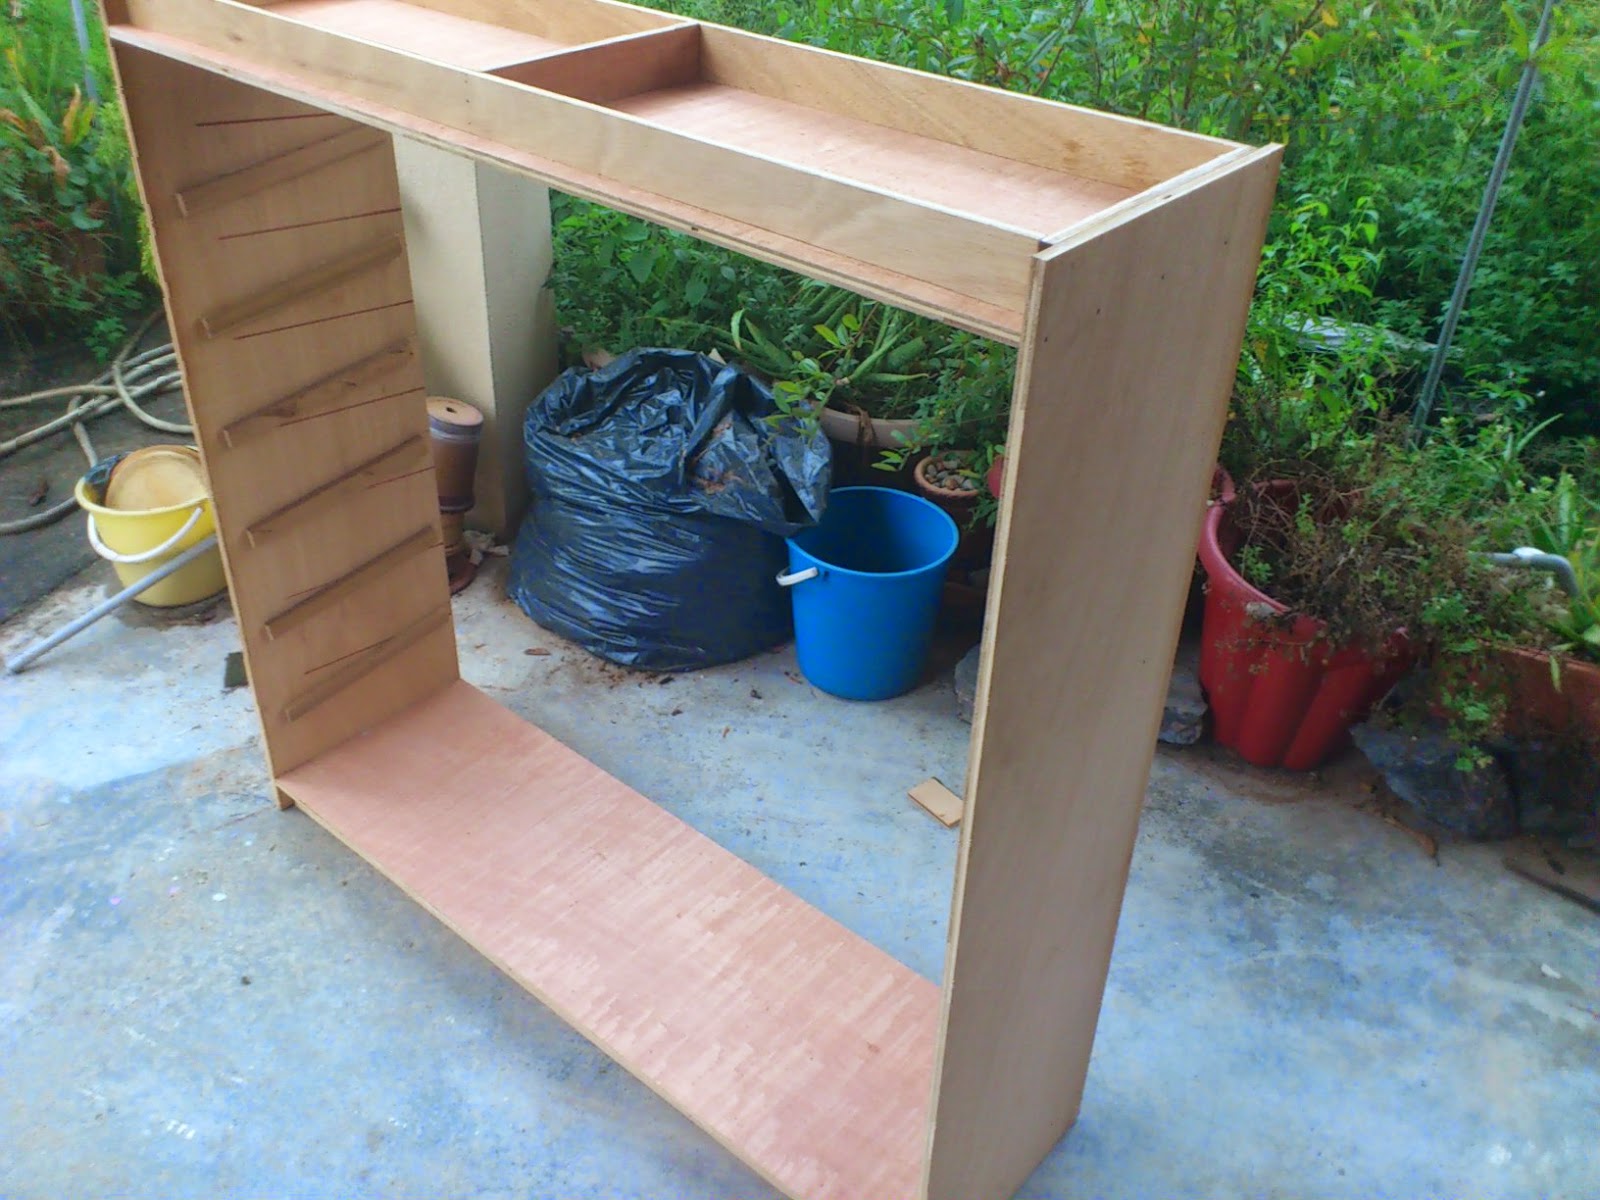
     But, on last week I managed to came out with the new ideal-which a bit concrete from the previous & seen to be the tough even for those plate arrangement. As support for the "Go-go Green" champagne, I recycled some of the wood stock from the previous " Outdoor Cage" & managed to turn it to this new tray. It attached in triple L bracket & screwed in wall-plug on 1 1/2" screw. The new tray was located a bit higher than the previous to support head area & together I did add some hook at below for extra hanging stuff(such as spoon, can opener,tea filter & etc) I did locate those 2 tray before & it park in peripheral angle to avoid any part to be drop down(in future). By the way-it was a fun project & wish to have a new challenge just like this. 
 Title : Upper Sink Tray
Period : 1/2 day
Finishing : Stain 

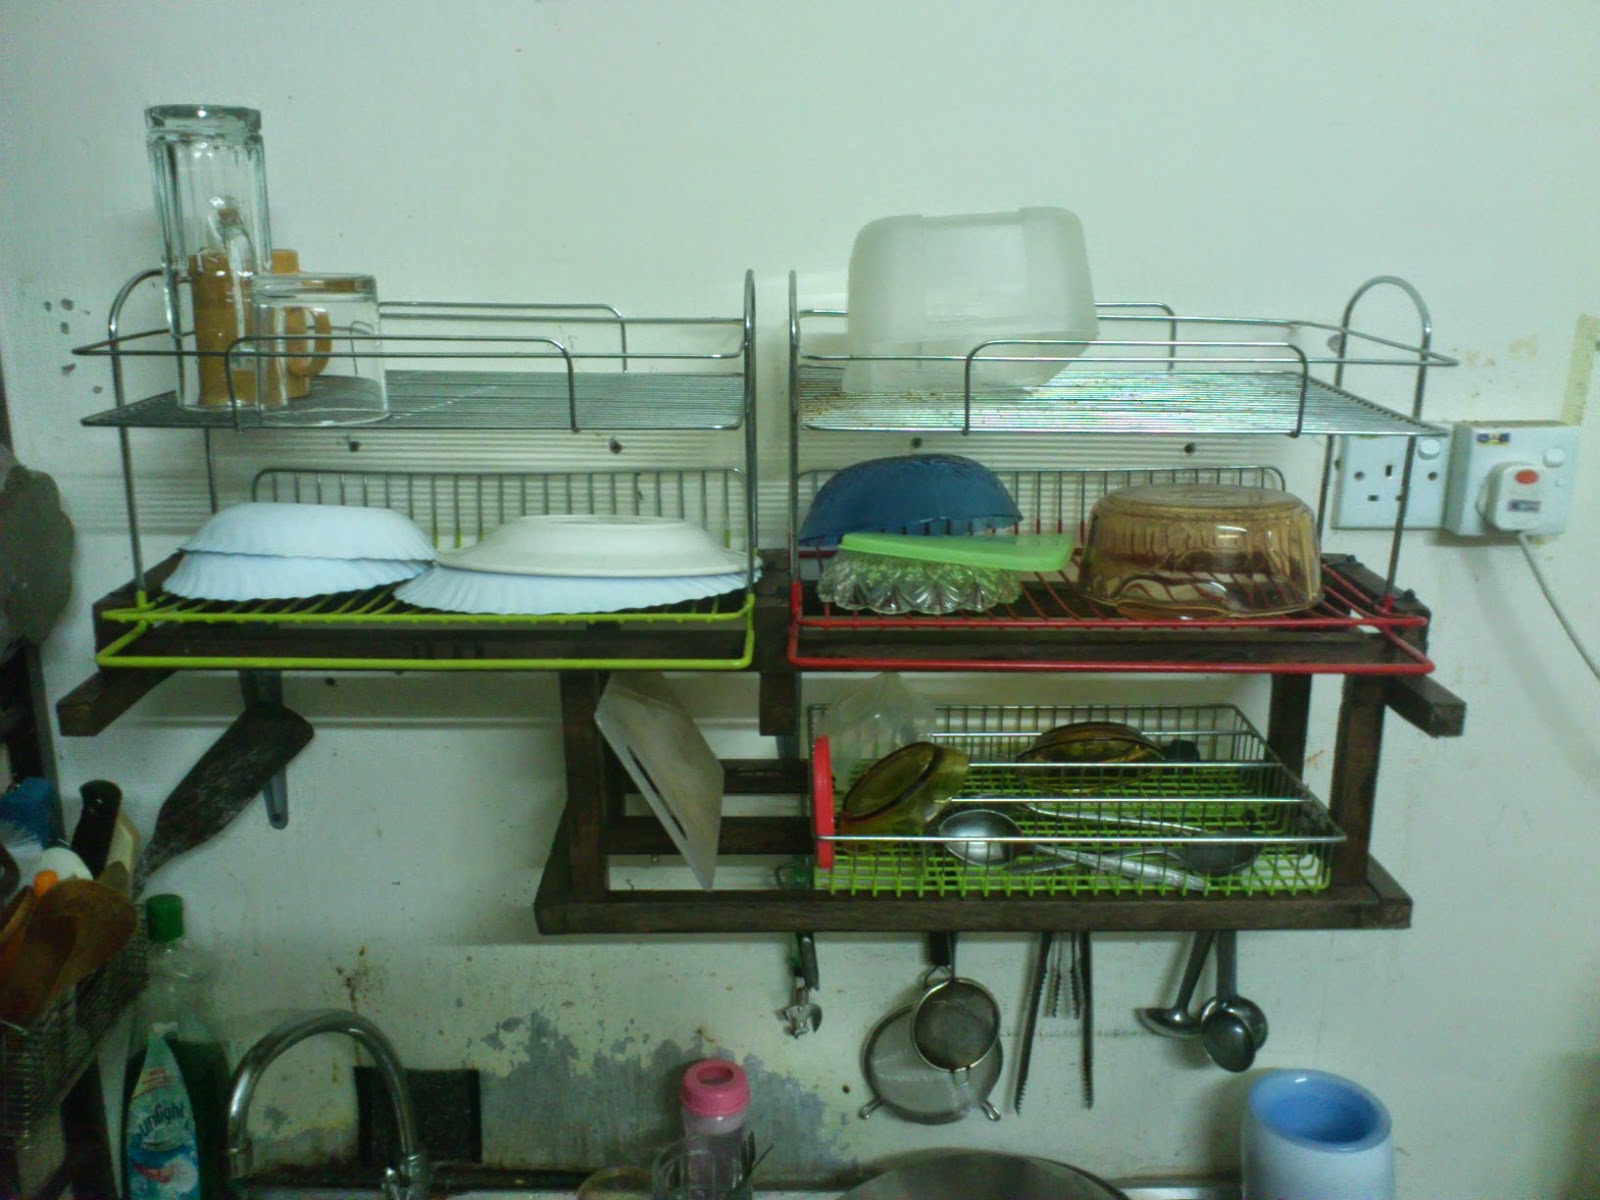
     In other hand, I did finish fabricated & installed the double-rack for the laundry need at the back area. Upper rack shall be for the detergent storage & lower rack shall be those laundry bucket, arranged in same level of washing machine for easy load & unload. Those rack attached via 10"x8" steeless L bracket with 1 1/2" screw+wall plug. Even I did test the lower rack, can be hold  & used as bench-waiting for long cleaning process. As pending items, still no action on the drain pipe of washing machine since it had the right direction(opposite) & didn't work on the present layout. As check on the drainage unit got a multiple fitting direction-but need some heavy & detail work to do that. I gonna study the manual on next week-promise Ummi!
  Title : Double Laundry Rack 
Period : 1/2 day
Finishing : Stain 
  
I did saw somethin..during installed the Outdoor cage, some mess around on certain corner with multiple broom. I'm really don't like it at all, it should be some arrangement to get it fix-thus I did come out with this design-used only some saw,screw & glue for the fabrication. All bracket arrange in average 10degree & can support multiple broom & easy to be install as it used only 2 screw for wall attachment(most of broom only took a couple gram)
   Title : Multiple Broom Bracket
Period : 1/2 day
Finishing : Stain 

An lastly, as in ideal-I did finish fabricated & installed a hanging towel unit & can easily flip for minimization of storage. The mechanism just a simple hinge attached in between of the hanger unit & the cage wall. So it shall be an extra hanging unit for drying section, especially when in rainy season(you know Malaysia weather-was a bit unpredictable)

 For those who believe in me, My heart will always be with you.Stay in touch!